

The reason why most model airplanes don't fly well is that they have not been properly adjusted. After finishing your paper airplane build, the importance of conducting a test flight and making careful adjustments cannot be overemphasized. If you continuously repeat the test flight and adjustment procedures, making careful and deliberate changes, your plane will slowly but surely arrive at a point where it will always fly smoothly and in a straight line. A perfect flight every time!
Try to test fly your plane when there is as little wind as possible. If there is a breeze, always throw your plane straight into the wind. When test flying your plane indoors, try to throw it towards a curtain or other soft furniture to ensure the safety of the plane.
During a test flight, do not throw the plane upward or with excessive force. Aim it horizontally or slightly downward and toss it gently forward to make the plane glide smoothly.
The goal for this procedure is to get your paper airplane flying smoothly straight forward with a gentle glide. If you know how to adjust your plane to do this, you will quickly become an ace pilot and get your newly built airplanes up in the air quickly.
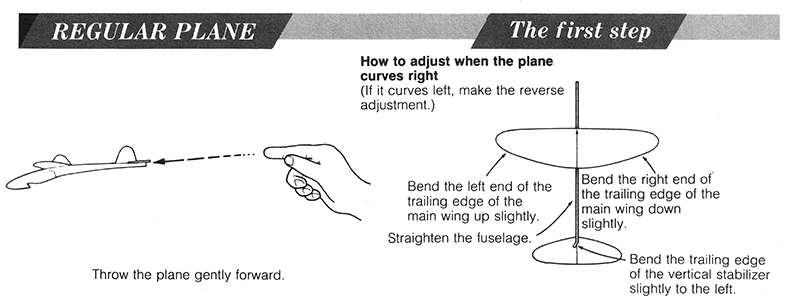
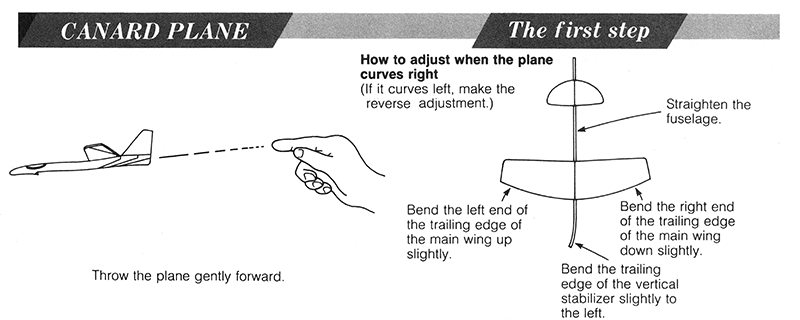
Airplane Curves to the Left or RightThe first thing to look for when test flying your plane is whether it flies to the left or right. If so, it is always because there is a bend or a warp somewhere on the plane. Therefore, the first step is to examine the plane again thoroughly and straighten out the affected parts with utmost care. If the plane still curves to the left or right, bend the trailing edge of the wing tips (ailerons) and the vertical tail plan (rudder) in the appropriate directions, according to the instructions later on this page. The goal is straight ahead flight.

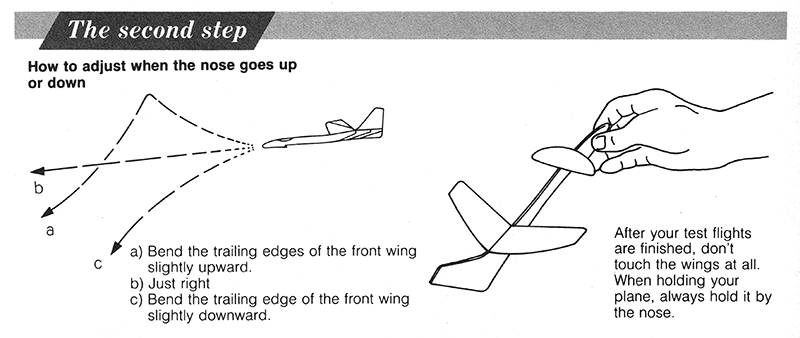
The second thing to test for is to see whether the nose goes up or down too much. First, check that the center of mass is at the indicated marking on the airplane. If the CG is correct and the nose goes up and the plane loses speed and then suddenly dips down, this is known as stalling. If the glider does this, a smooth flight pattern can be achieved by adjusting the back edge of the horizontal tail surface (elevators) slightly downward. This is for a regular plane with a traditional tail. For V-tail, delta and canard planes, see below for instructions.
If the airplane dives straight into the ground, you can correct this by adjusting the elevators of a regular slightly upward. For V-tail, delta and canard planes, see below for instructions.

After finishing the initial test flight and adjustment procedures for optimal straight-ahead flight, the next step for an advanced pilot is to learn how to steer their airplanes so they fly in the direction that they want them to go.
Often, paper pilots will want to adjust their airplanes for a circular flight pattern. When this is done, you won't have to walk as far to pick up the airplane for the next flight. The airplane will circle overhead and may even land at your feet.
To make these adjustments you need to know how bending a portion of a wing changes the flight pattern. Find the section for the type of airplane that you have and follow the instructions. In most cases, paper airplanes will fly well if you follow the adjustments mentioned below. Start with small adjustments. Sometimes just a 1mm bend can induce the desired change.

A regular plane is one that has a large wing in the front and a T-shaped tail in the back comprised of a horizontal stabilizer (elevator) and vertical fin (rudder).
To adjust a regular plane for a circular flight pattern, bend both sides of the trailing edges of the main wing (ailerons) and the trailing edge of the vertical fin (rudder) as shown. When you want to induce a tight curve of the airplane at a bank angle greater than 30°, bend the trailing edge of the horizontal tail surface (elevator) slightly upwards in addition to the bending shown in the diagram. Increase the upward angle of the elevator to increase the bank angle and make a tighter turn.
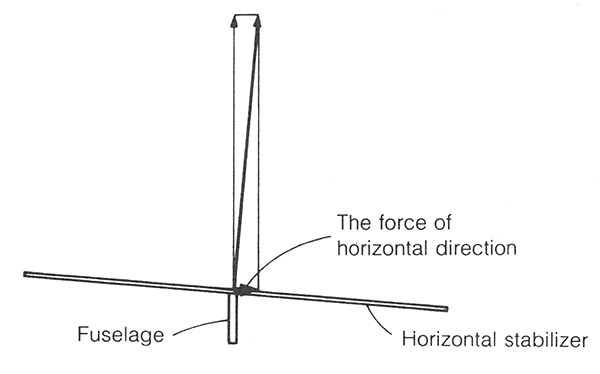
Another method for achieving circular flight is to put a tilt into the horizontal tail surface relative to the main wing. For example, if you tilt the entire horizontal tail surface to the right, then a small component of the lifting force will be pushing the tail to the right and the nose will move to the left. If the tail is difficult to bend, then you can instead bend the wing in the opposite direction. In this case, tilting the entire wing to the left will cause a gentle left turn.
To make the nose of the regular airplane go up or down (called pitching), you can adjust the trailing edge of the horizontal tail surface (elevator). Bend the elevator down if you want the nose to go down. Bend the elevator up if you want the nose to go up.


A canard plane is one that is the reverse of a regular plane. It has a large wing in the back and a smaller wing (the canard) in the front.
To adjust a canard plane for a circular flight pattern, bend both sides of the trailing edges of the main wing (ailerons) and the trailing edge of the vertical fin (rudder) as shown.
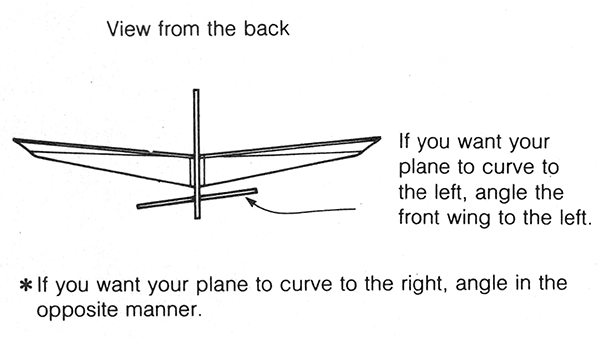
Another method for achieving circular flight is to tilt the front canard wing relative to the main wing. If you want your airplane to curve to the left, tilt the front canard wing to the left. Alternatively, tilt the main wing to the right.
To make the nose of the canard airplane go up or down (called pitching), you can adjust the trailing edge of the front canard wing. Bend these edges down to make the nose go up and bend them up to make the nose go down.

A delta plane is one in which the wing and the horizontal tail surface are combined into one large flying surface.
To adjust a delta wing for a circular flight pattern, bend both trailing edges of the delta wing (elevons) and the trailing edge of the vertical fin (rudder) as show in the diagram. Increase the bending to increase the bank angle of the turn.

To make the nose of the canard airplane go up or down (called pitching), you can adjust the trailing edge of the delta wing (elevons). Bend them up to make the nose go up and bend them down to make the nose go down. If you want to combine an up/down adjustment with a circular flight adjustment, then add the adjustments together which will result in each elevon being bent a different amount.


A V-Tail plane is one that has a normal wing in the front, but the tail has two symmetrical surfaces going up and out at an angle.
To adjust a V-Tail airplane to fly in a circular pattern, bend the trailing edges of the main wing (ailerons) and the trailing edges of the tail (ruddervators) according to the diagram. Increase the bending of the tail to increase the bank angle.
Another method for achieving circular flight is to tilt the entire V-Tail to one side. Tilt it to the right to make the airplane turn left. If the V-Tail is difficult to tilt, then you can instead tilt the wing in the opposite direction.
To make the nose of the airplane go up or down (called pitching) bend both sides of the trailing edge of the V-tail in the same direction. Bend up to make the nose go up and bend down to make the nose go down. If you want to combine an up/down adjustment with a circular flight adjustment, then add the adjustments together which will result in each side of the tail being bent a different amount.
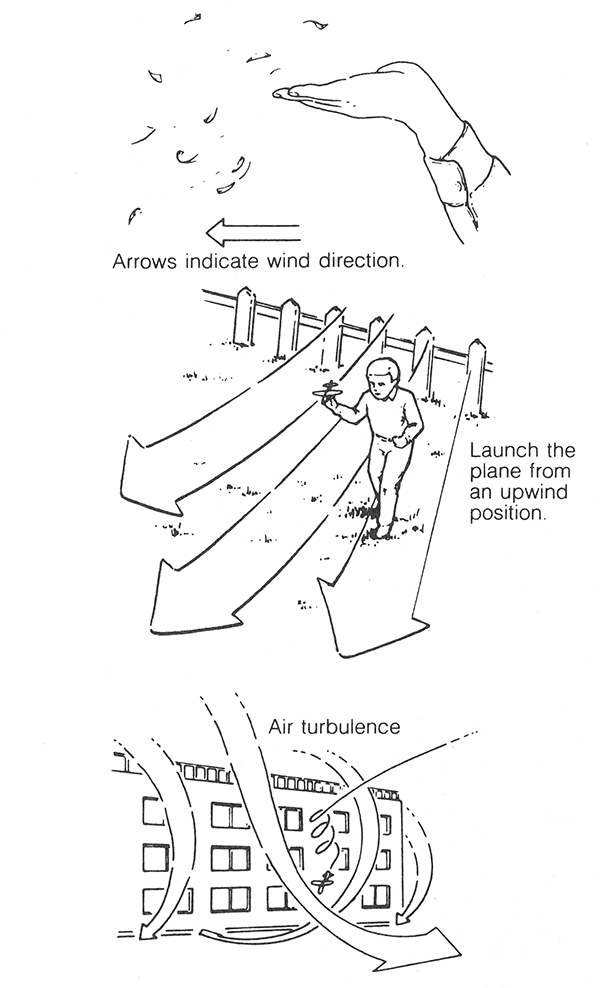
Now that the test flying is over, lets go outside to a wide open space and fly your plane! To protect your plane from wear and tear, it's best to fly it in a field of soft grass. When you get out into the field, the first thing to do is determine the wind direction. To do this, pull a few blades of grass and toss them into the air.
If you are flying your plane outside with a wind blowing and want to keep your plane's flight pattern within a limited area, it is best to stand in an upwind position and throw your plane with the wind. Always be sure to return to the original upwind position for launching in order to prevent the plane from gliding beyond the flying area.
It is not good to fly your plane if the wind is too strong. When a strong wind is blowing, great turbulence is created in the vicinity of large buildings. In such places, you will never be able to fly your plane successfully when the wind is strong, so it's best to wait for a day when the wind is gentle, or go fly indoors.
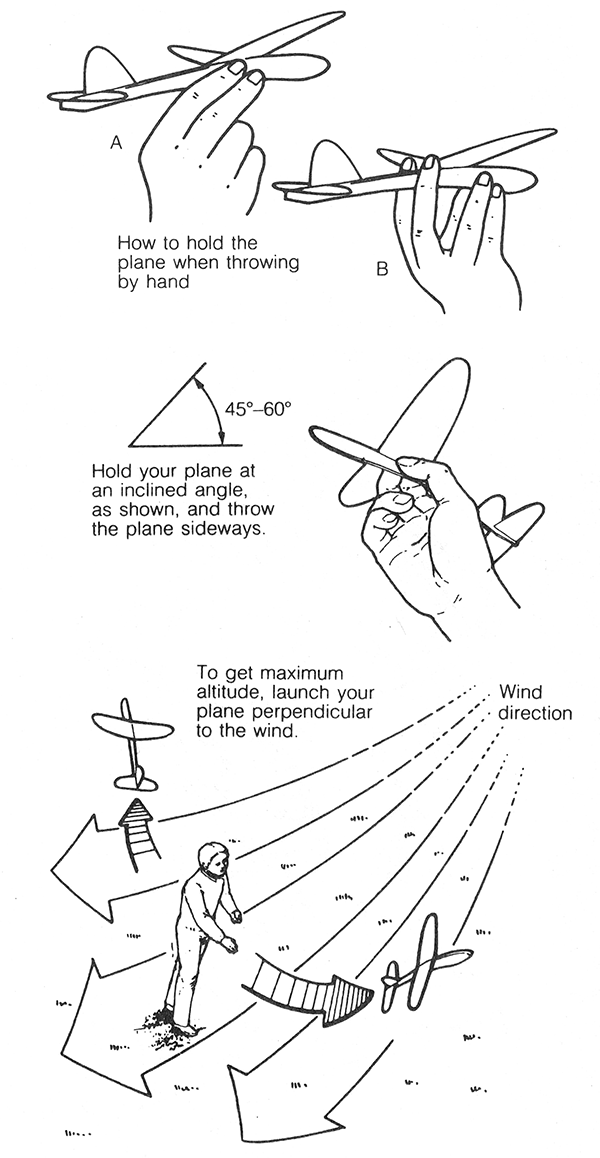
To throw your plane high, there are two ways to hold it, as shown in the figure, either by grasping the body with your fingertips (a), or by placing your index and middle fingers behind the main wing on both sides of the fuselage (b). Use whichever method you find easiest and most natural.
If you hold the plane horizontally, and throw it up and forward, it will "loop the loop" and dive down, so it is very difficult to get it to glide at a high altitude. In order to overcome this difficulty, tilt the plane at a 45-60° angle when throwing. Your plane will curve outward as it gains altitude, then it will gradually level off and glide on a straight course. If your plane still tends to "loop the loop", adjust the horizontal stabilizer (elevator) slightly to give it a downward pitching tendency.
Contrary to test flying instructions, it is great to launch your plane perpendicular to the wind when "high-flying" it. The reason for this is that when throwing your plane upwind, the plane has a tendency to loop; conversely, when throwing your plane downwind, the plane has a tendency to stall, due to the decreased relative airspeed over the wings. When throwing the plane perpendicular to the wind, neither of these faults is apparent, so it is easier to obtain good flight results.
If an especially large wide open space is available, it's good to fly your plane in the following manner: before launching, adjust the main wing and vertical tail plane in the directions necessary for a left turn. Then, take the plane in your right hand, incline the plane to the right and throw it upward. If you do this, the plane will spiral upward in a clockwise fashion until it has obtained a considerable altitude, then it will slowly spiral to the left in a counterclockwise fashion, for its descent. If your plane has been adjusted well, it will remain aloft for 15-20 seconds or more.

In order for a paper plane to stay aloft for over 30 seconds, it must make use of rising air currents. Rising air currents can be of two kinds: those resulting from the flow of wind over an inclined surface, called ridge lift, or rising columns of warm air, called thermals. Paper planes fly well in thermals. Thermals originate when the earth's surface is heated by the sun. They usually originate over city streets, deserts, and plains with short grass. Lakes, rivers and forests, however are difficult to heat up, so these areas favor the formation of downdrafts, or descending air currents. You will be most able to make use of "thermals" if you fly your plane over wide open grassy areas or concrete lots.
To enable your plane to make the best use of these thermals, it's best to adjust it to fly in a circular pattern, then launch or throw it as high as you possibly can. Although invisible to the naked eye, there are what can be called "bubbles" of warm rising air over patches of heated ground. Therefore, if you throw your plane as stated above, getting it to go around in circles, and the plane enters one of these "bubbles", its chances for remaining inside this "bubble" for a considerable length of time are increased.
The best time to make use of thermals is between 9am and 12 noon on days when the skies are clear and the winds are gentle. Although the strength of thermals increases during midday (9am-4pm) when the sun is shining most strongly and the highest temperatures are reached, gusty surface winds also get stronger in the afternoon, often making it difficult to fly paper planes. Actual atmospheric conditions will not always occur at the above-mentioned times however, so always keep an eye out for chances to fly your plane.
All of the Whitewings racer models are designed to fly over one minute in rising air currents if adjusted carefully.
If you use a rubber band catapult, you will be able to fly your plane at a high altitude for a long time. Another advantage of using the catapult is its ability to maintain the desired position of the plane at launching and thereby ensure a proper flight course.
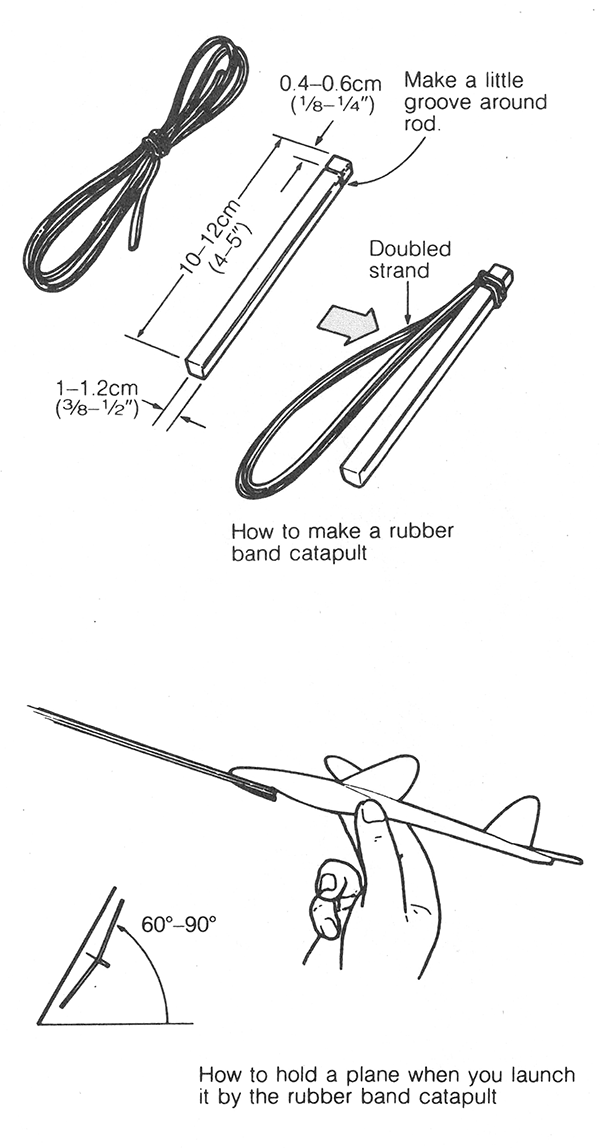
A catapult can be made easily from a wooden rod and long rubber band. Make a groove at one end and fasten the rubber band tightly onto the rod in the grove, making a double strand. Detailed Instructions Here.
When launching by catapult, suspend the rubber band on the hook, holding the fuselage securely with your fingers. If you use more than just your fingertips, you may sometimes damage the horizontal tail stabilizer when the plane is launched. Pull the plane back, being careful not to bend the fuselage. Try launching with just a little tension at first to check your plane's overall condition. If the plane is well adjusted, then you may go ahead with a true launch, but too much tension on the band will cause flutter. On a real plane, flutter will cause disintegration in mid-air. Flutter is occurring when your paper plane makes a vibrating sound. To avoid this problem, try not to put too much tension on the rubber band.
When using a catapult, as when hand launching your plane, incline the plane at 60-90° angle to the ground in order to avoid loops. Another effective method that serves to discourage the looping tendency is to bend the trailing edge of the horizontal stabilizer (elevator) slightly downward.

When considering the proper inclination that your plane should have when catapulting it, you must remember its curving tendency. If you have a plane that tends to curve to the right, then the more you incline it with the right wing downward (as in figure A) the more the plane will tend to plunge down to the ground. If you try reversing this inclination and incline the left wing downward (as in figure B) you will obtain better flight results.
All the Whitewings models with a catapult hook or notch are designed to be launched by the described catapult. Flutter will not be a problem if all parts are securely glued.
When you launch your plane by a rubber band catapult, pay attention to the wind direction. In a strong wind, stand with your back to the wind to prevent the plane from veering towards you. However, in a gentle wind you can launch your plane in any direction: If launched against a gentle wind, your well-adjusted plane will reach even higher altitudes. In contrast, if you stand facing a strong wind, the plane will not make a smooth take-off, and may be damaged by hitting against the rod of the catapult, or your fingers.
Precautions for Rubber Band Catapult LaunchingBe careful of others and yourself when launching your plane. Because the planes take off with tremendous speed, it is too dangerous to use the catapult indoors, small parks or anywhere there are lots of people. If you're very careful, you might be able to safely launch your planes by hand in these areas. Even when in a wide open space, please be careful. Keep these safety rules in mind and enjoy flying your planes.