
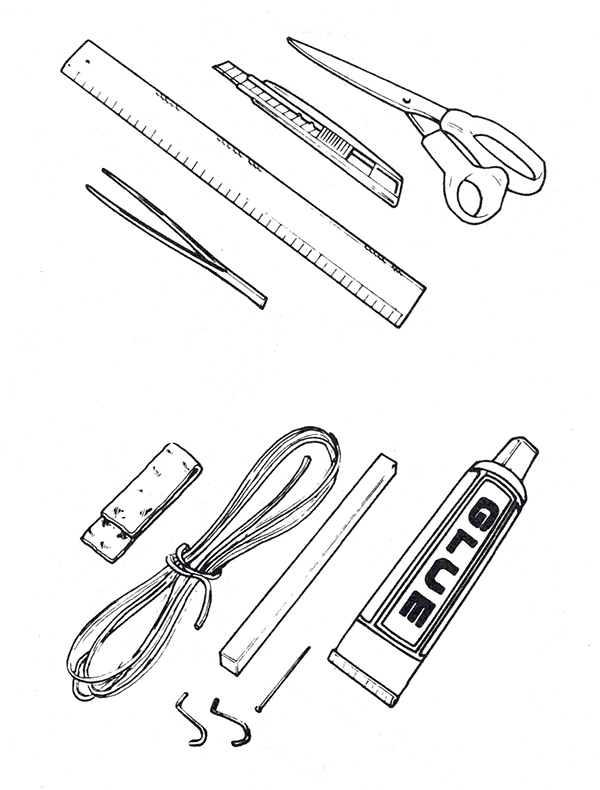
Scissors: Get a pair of sharp scissors that cut well. Dressmaker's or Tailor's scissors are excellent.
Hobby Knife: A sharp precision hobby knife will be the best tool for making detailed cuts. You can use this to cut out all the pieces, or use a scissors and then use the knife for cutting slits or intricate detailed areas that are difficult to get to with the scissors. A #2 or #11 blade is the ideal shape.
Cutting Mat: Used for protecting your table from your hobby knife.
Ruler: A thin metal straight edge is ideal for making accurate creases.
Tweezers: Used for checking the center of gravity and for assembling the smaller pieces.
Awl: Used for poking holes.
Glue: A clear, fast drying glue is most suitable. Avoid super glue (cyanoacetate) as it can discolor the paper and it dries stiff. A white PVA glue works well if used sparingly. If you use too much, the moisture can can cause the paper to warp. Glue stick is an excellent choice as it is easy to apply and dries quickly. You can also look for paper glues that advertise "wrinkle free" and "fast drying".
Rubber Band and Rod: Used for making a catapult launcher.
Straight Pin: Used for making small pinholes.
Pin, toothpick or Bamboo Stick: Used for making propellor shafts and wheel axels in some models.
Balancing Putty: Small amounts of clay or putty can be used to adjust the center of mass.
Tape: Clean cellophane tape can be used for making repairs or reinforcing parts. It can also be used for adding small amounts of weight to adjust the center of mass.
Wax Paper: Use to protect your table from excess glue.
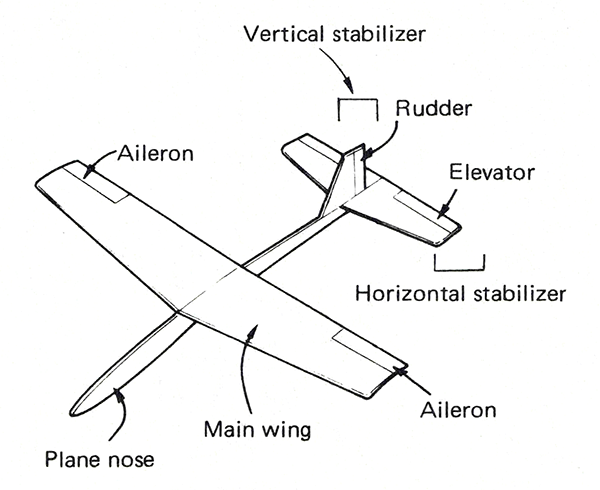
The figure shows the parts of an airplane and what they are called. When the "left side" or "right side" is mentioned, it is referring to the side of the airplane that the imaginary pilot would see. In other words, looking from back to front.
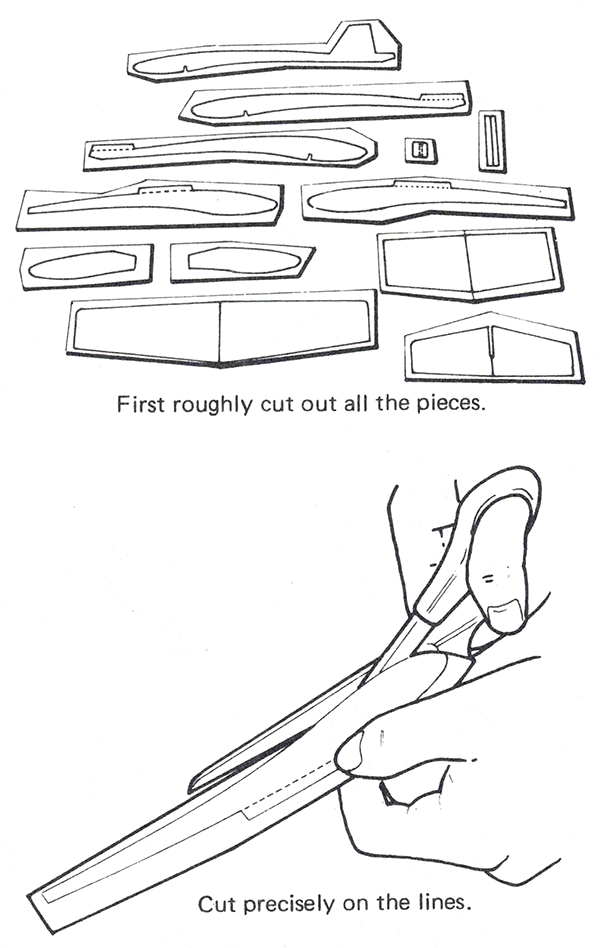
If using scissors, roughly cut out the pieces leaving space around each piece. Take care not to cut into adjacent pieces. Then go back and carefully trim each piece to size precisely along the lines. Use your hobby knife for precision cuts on detailed features. You can also use your hobby knife to carefully cut the entire piece out of the main paper. Take your time and carefully trace each line.
Some Whitewings kits come with pre-cut paper parts. In this case you will simply need to use your hobby knife to carefully cut the little tabs holding the pieces to the main piece of paper. The edges of these pre-cut paper pieces may tend to have slight curve towards the unprinted side. Make sure you flatten any curved pieces before assembly.
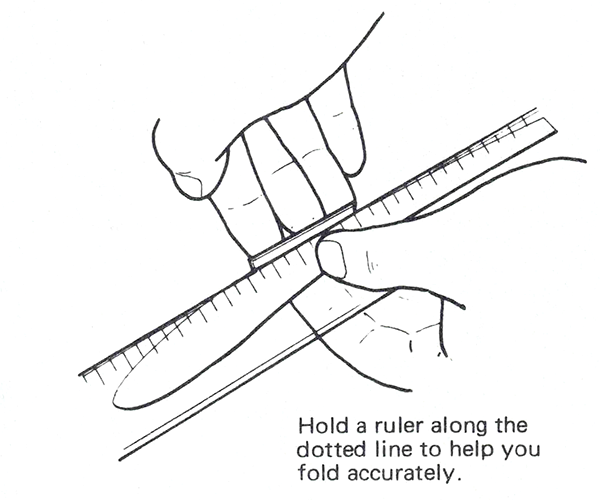
Using a straight edge, like a metal ruler, pre-bend all the tabs. Make sure that each tab is neatly folded along the dotted or pressed lines in the direction indicated in the building instructions. Do this before gluing.
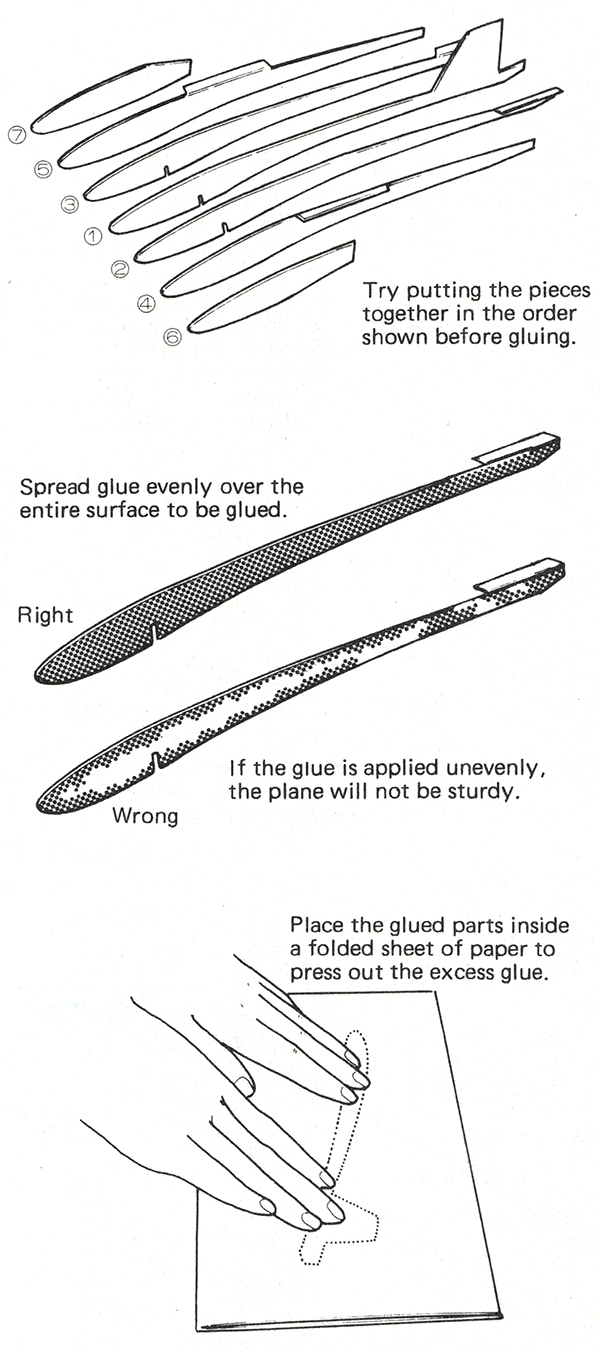
Before gluing the pieces, fit them together according to the instructions and make sure everything lines up and fits according to the directions. Make sure you have the left/right sides oriented the correct way and that all the tabs are folded in the correct direction.
After you have satisfactorily dry-fit all the pieces, carefully glue the pieces in the indicated order. To prevent warping, place the glued pieces on a flat surface and weigh them down with a flat object, like a book. Use a piece of wax paper to protect your table and book from the glue.
Apply the glue evenly and quickly. Use enough glue to cover the edges, but not so much that the glue squeezes out and makes a mess. Too much glue adds unnecessary weight which will harm performance, but too little glue will make a weak construction that may break easily. Make sure that the assembled pieces do not slip out of position while drying.
Gradually assemble the airplane piece by piece in this fashion according to the directions. Allow ample time for the glue to dry before moving on to the next steps.
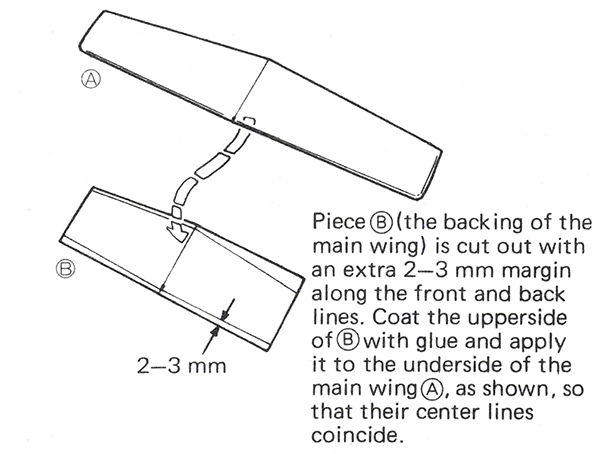
When assembling the main wing, which usually has two layers, you may want to cut out the bottom layer with a 2mm-3mm margin around the black line. Then glue the two pieces of the wing together and once the glue has dried you can use your hobby knife to precisely trim away the excess on the bottom layer. This ensures the most accurate alignment.
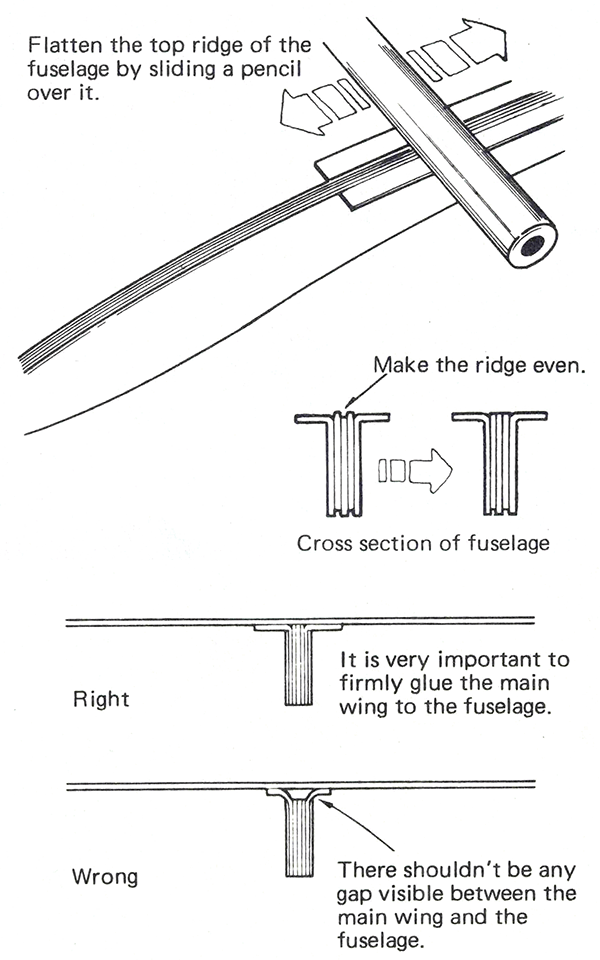
When attaching the wing or tail pieces to the folded tabs on the fuselage you should flatten the tabs to get the strongest glued joint. Use the flat side of your scissors or a pencil to rub over the edge of the paper between the folded tabs. This will flatten it out and make the wing/tail pieces attach better.
The importance of gluing the main wing firmly to the fuselage cannot be overemphasized. In order to not leave any gap between the main wing and body, press down firmly on the center of the main wing and press up on the tabs for about 5 minutes after gluing. Do not leave any gap between the wing and body of the airplane. Let it dry thoroughly before handling.
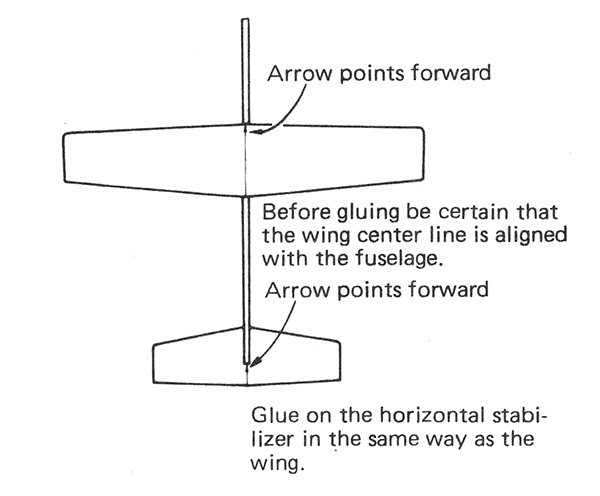
When gluing the main wing and horizontal tail stabilizer to the fuselage make sure that the center line is properly aligned lengthwise with the center of the fuselage. Make sure that the front of the wing/tail pieces (indicated with a dot or arrow) are facing forwards. You will likely find that gluing the horizontal tail stabilizer before gluing the wing will make assembly easier.
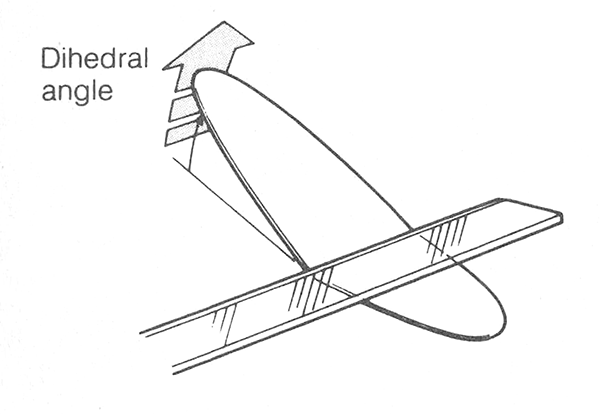
Place a ruler along the center line of the main wing and bend them slightly upwards, making a dihedral angle, as shown in the figures. You may also have to do this on some horizontal tail pieces as indicated. The dihedral angles vary by airplane model, so follow the directions and use the included dihedral angle gauges to check your work.
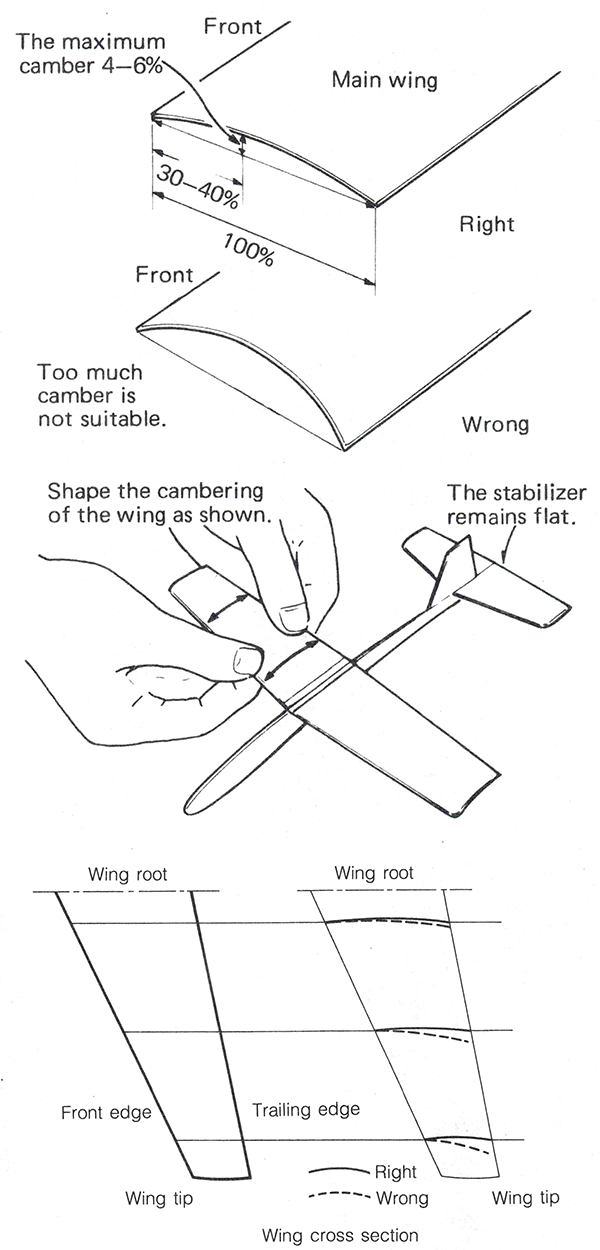
To make a truly high performance plane, it is important that the cross section of the main wing be curved in such a fashion as to minimize drag and maximize lift. To make the proper curve, bend the main wing slightly in the manner shown in the figure. This is called cambering the wing. This shape is necessary for top performance.
Use the figure as a guide to give an appropriate camber to the main wing. The maximum camber point should be between 30% and 40% from the front leading edge of the main wing. Only the main wing should be cambered. The tail surfaces should be left flat.
Many models will include a camber gauge that you can use to make sure you applied the proper camber. After adding camber, make sure the dihedral angle is still set to the proper angle. Work slowly and carefully to make sure that the camber and dihedral angle are both set properly. Use the included camber and dihedral gauges to check your work. After an airplane has been flown several times or stored for some period of time, recheck the camber and dihedral to make sure they are still set correctly.
When cambering a swept back wing, take care that the camber arc is placed evenly from the wing root to the wing tip. What you don't want is for the trailing edge at the wing tips to be set lower than the leading edge, as this will cause unwanted tip stalling.
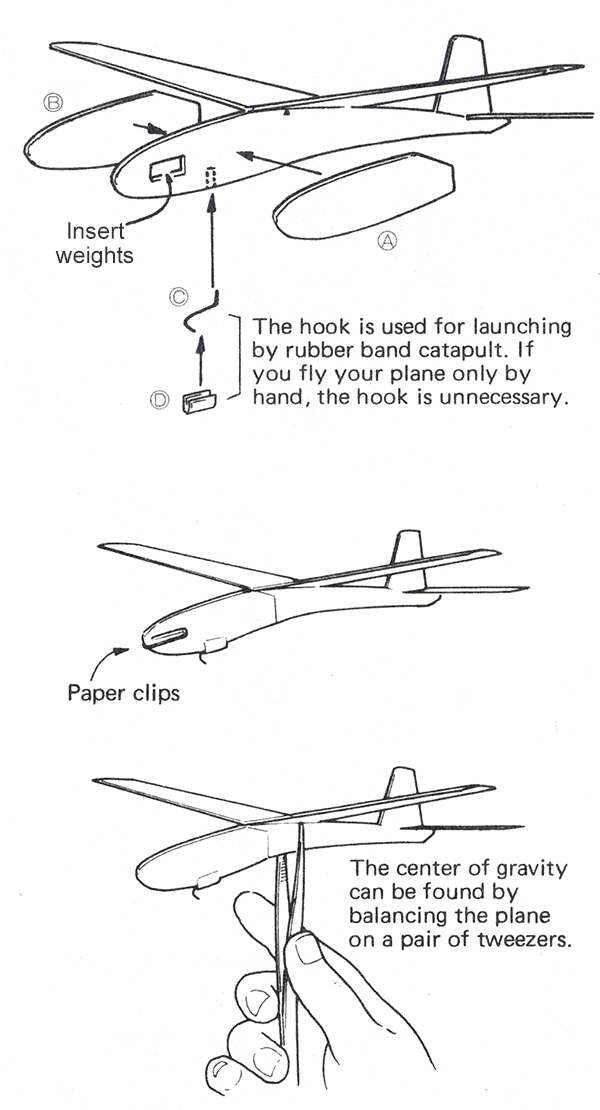
The ideal balancing point (called the center of mass, center of gravity or simply CG) is indicated on the models by a ▲ triangle mark, a ![]() icon, or two pinholes under the wing. The airplanes are designed to balance at this mark after construction, but due to excess glue and paper differences, small adjustments may be necessary to get the CG aligned with the balancing marks. To test that the center of gravity is properly aligned, take an open pair of scissors or tweezers and balance the plane on the two tips.
icon, or two pinholes under the wing. The airplanes are designed to balance at this mark after construction, but due to excess glue and paper differences, small adjustments may be necessary to get the CG aligned with the balancing marks. To test that the center of gravity is properly aligned, take an open pair of scissors or tweezers and balance the plane on the two tips.
There are several ways to make adjustments to the CG. Some models allow you to insert weight inside the nose before attaching the final piece of paper. Temporarily add weight, attach the paper and test the CG. Make adjustments until you are happy and then glue on the final piece of paper, hiding the weights. There are many different common materials that you can use for weight:
You can also cut and glue a small scrap of Whitewings paper to the nose of the airplane to move the CG forward or glue it to the tail to move the CG backwards. A small piece of clear tape can also be used to add some weight where necessary. If you want to make temporary adjustments to the CG you can use a small ball of clay or putty that you stick onto the airplane.
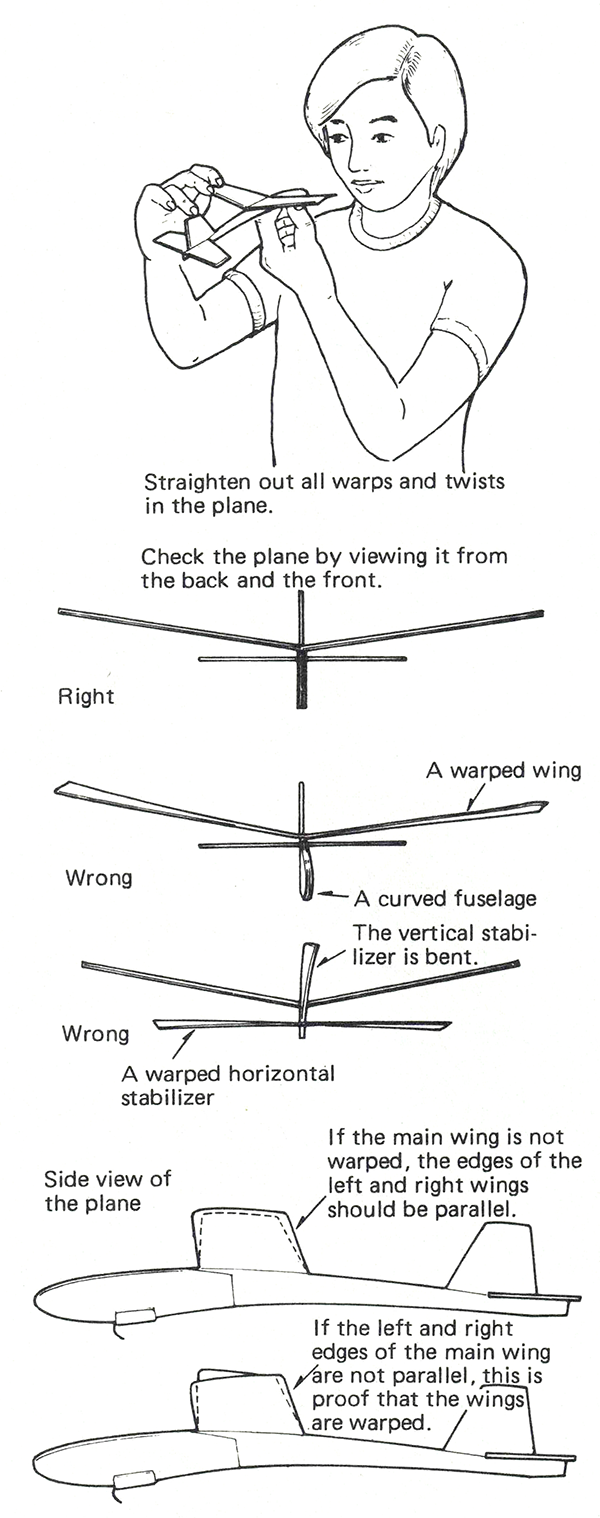
One of the secrets to making a good flying paper airplane is to view the airplane carefully from a head-on position and straighten out all warps, bends or twists with you fingers. Inspect your plane thoroughly from the front.
Check for these irregularities and straighten out the bends or warped areas gently and carefully. Inspect your plane from the rear and check for irregularities in the same manner as above.
Check the plane from both sides also. Do the inclinations of both the near and far wing tips match? If they don't, this is proof that the main wing is warped, so straighten it out with you fingers until the wing tips line up perfectly. Repeat this inspection after a rough landing, or after a plane has been stored for a long time.
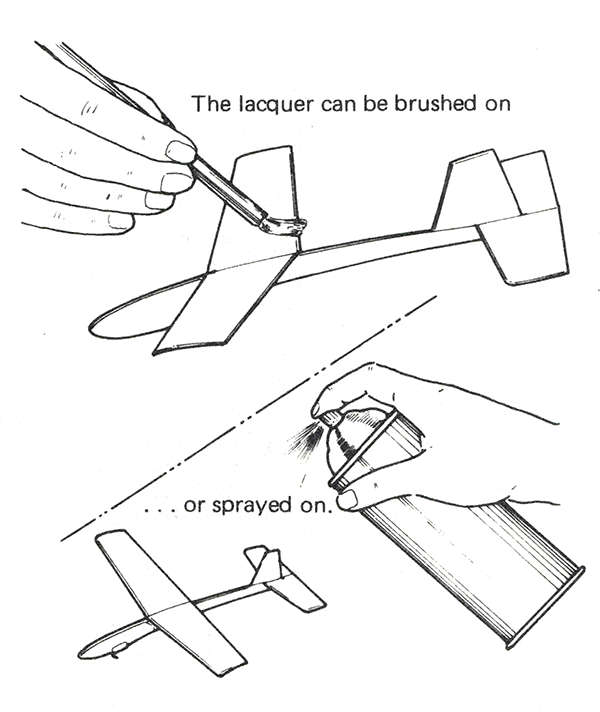
To make your airplane water resistant you can spray or paint it with clear or colored lacquer. If you fly in the morning when there is dew on the grass, this will protect your airplane from moisture. To keep the airplane light and preserve its CG balance, be careful to apply a thin and even coat of lacquer.
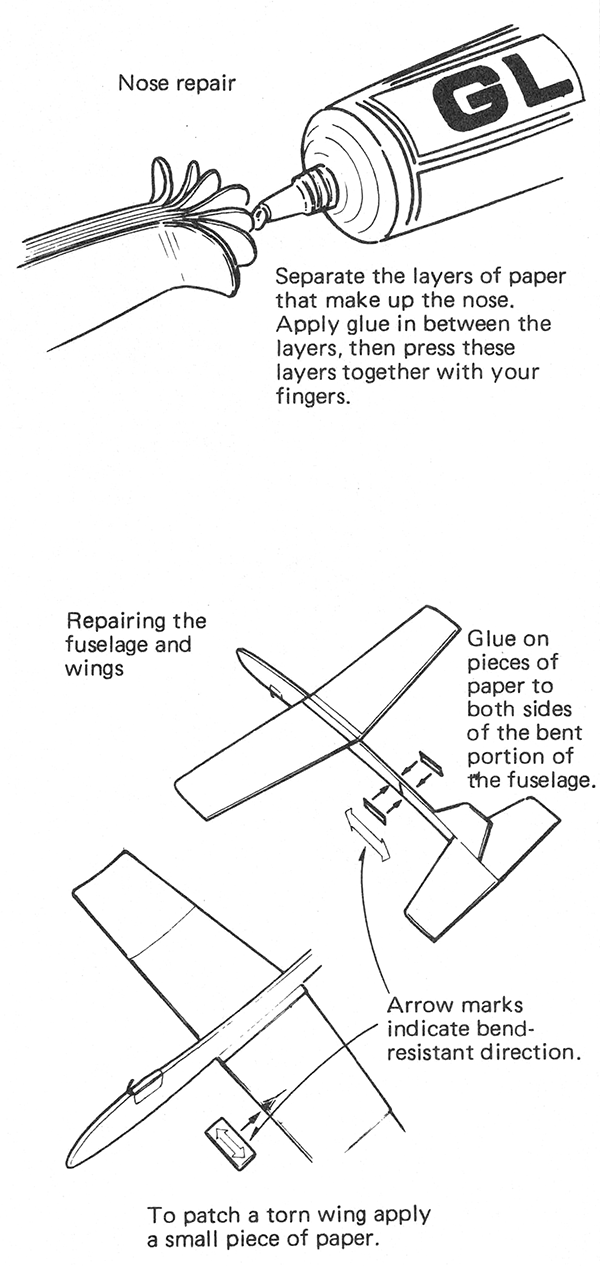
Even if your plane becomes damaged, if you repair it, you should be able to fly it again and again. When paper planes dive to the ground or crash into a wall, the nose is especially vulnerable to damage. If any dirt or pebbles are embedded in the nose, remove them with a pair of tweezers. Separate the various layers of paper as shown in the figure and coat all the inner surfaces with glue. Then press the layers together from the outside and, pressing hard, squeeze out all of the excess glue, just as you did during assembly. Let the glue dry thoroughly.
If the wings or fuselage are bent or torn, reinforce the damaged parts from the outside by gluing on small pieces of paper, as show in the figure. These small pieces of paper should preferably be pieces of scrap paper left over from building your plane. These pieces of paper are bend-resistant in the direction of the wing tips so be sure to cut out and apply them in the proper direction. The bend-resistant direction of the paper is indicated by an arrow on each model sheet.
A high viscosity cyanoacrylate "super glue" is best for repairing a broken balsa body. When using it, be careful not to get it in your eyes or smear your fingers with it.
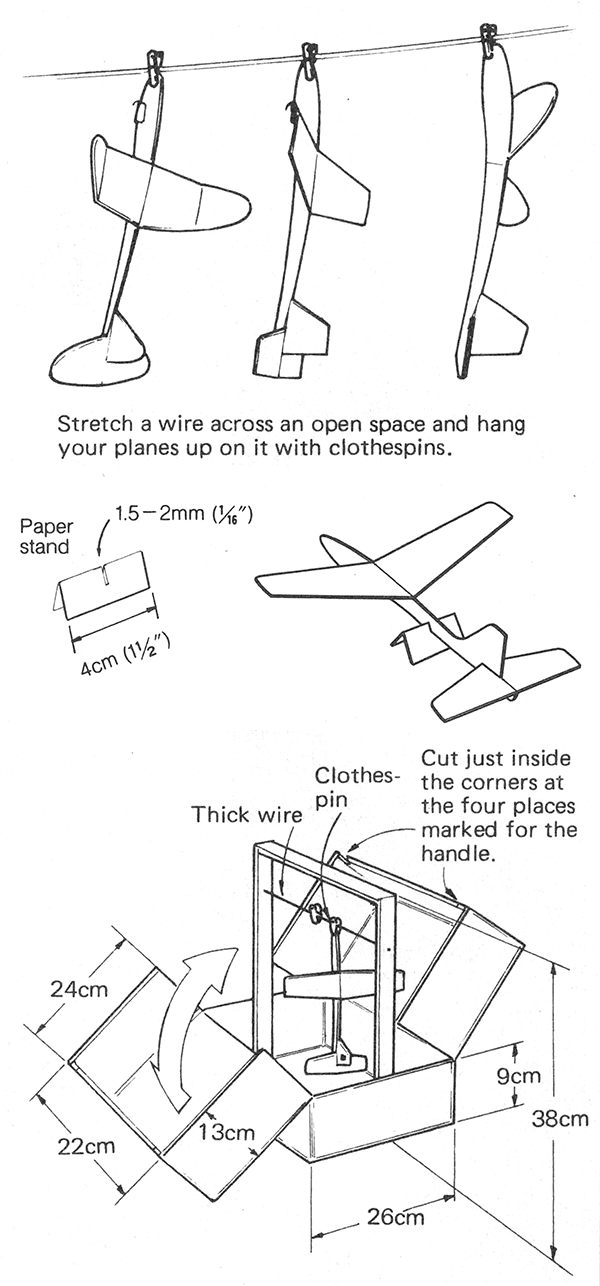
If your paper planes are well made, you should be able to preserve them with minimum care, thus enabling you to fly them for many years. For storing a large number of planes when not in use, you should stretch a piece of wire or string between two hooks and fasten the planes by their noses with clothespins. Let them hang vertically as shown in the figure. This has the advantage of taking up only a small amount of space, and also of minimizing the accumulation of dust on the wings.
You can enjoy airplanes not only by flying them, but also by viewing them on a stand on your desk. A paper stand, that can be made very easily, is quite useful as a support for displaying an airplane.
In order to transport your paper planes safely from your home to an open area, we recommend using a carrying case. You can make it yourself from a cardboard carton or a light wooden box. The carrying case should be large enough to accommodate each plane it its own space without overlapping with the others so that the planes are ready to fly with only a little adjustment.